Motivation
Deep learning is all the rage nowadays - and for good reason. As this excellent post by Andrew Ng shows, no other machine learning model can absorb extremely large datasets as well as a properly architected deep net. In addition, there are more and more frameworks and packages that make training deep learning models simple. Packages such as Keras and Tensorflow enable scientists without a PhD level understanding of deep learning techniques to quickly spin up a network to attempt to solve a business problem. These packages are able to use GPU acceleration, so that the models train quickly. Finally, there are ample examples on the internet of how to train these models, making it easy for a programmer or data scientist to begin experimenting quickly.
One of the areas where deep learning technology lags, however, is in productionalizing models. Most of the samples available online go as far as training and saving a model, and perhaps hand-wave on how this model could be “loaded by a client application later.” There are few concrete examples of how to actually deploy these models to production. Without this crucial step, the model is useless for all practical applications. If you happen to be using Google’s Tensorflow library for training your model, you may be able to use Tensoflow Serving for deployment, but there are a few limitations that make this not suitable for all applications:
- As of this writing, Tensorflow Serving only supports models with a single input / single output. If your model takes in multiple inputs, you’re out of luck.
- Environment setup is complex.
- TensorFlow Serve requires native code, as it is written in C++. This may preclude certain deployment options / require maintaining additional infrastructure.
Enter Azure App Services. Azure App Services is a very convenient method for deploying web applications. It provides full integration with other Azure services that are helpful for building and maintaining a production web service, such as Application Insights, API Management, and Azure Traffic Manager. It supports a variety of languages out of the box, most notably Python. Deployment is easy - just click “publish.” No VMs to maintain and no firewalls to configure. Even better, it’s possible to get started for free!
Given this, it seems like Azure App Services would be a natural target for hosing Keras models. It turns out, it’s a good solution given the following caveats:
- Your model must be small enough to fit into the memory of whatever app service plan you decide to select.
- A GPU will not be available on the app service plans. Therefore, prediction will done using the CPU. For anything but the deepest models, this isn’t too big of a performance hit, but if the application is very performance sensitive, App Services may not support your needs
It turns out that there is a bit of complex / hacky setup needed to get App Services and Keras / Tensorflow to play nicely together. The issues stem from the following facts:
- App services only supports python 3.4 by default. This is a problem because Tensorflow requries python 3.5.
- Extensions are available for python 3.5 and 3.6, but they need to be explicitly installed and enabled for each App Services instance.
- In addition, the project needs to be explicitly configured to use python 3.5 and 3.6. It is not sufficient to install the extension; if the project is not configured properly, the default 3.4 interpreter will be used.
- Visual Studio 2015 will not allow deployment with a python 3.5 or 3.6 virtual environment. Deployment fails with an error.
- Conversations with the python team and other experiments at Microsoft have led me to believe that the
tag does not work or exist. They have confirmed that this is an arbitrary restriction, and has been lifted in Visual Studio 2017. However, VS2017 crashes a lot more frequently, so pick your poison ¯\_(ツ)_/¯ - Also, you must have a virtual environment to deploy to Azure, so you can’t get around it by using your local environment.
- In this tutorial, we will solve this with a dummy deployment virtual environment. Hacky, but it works and isn’t too much overhead.
- Conversations with the python team and other experiments at Microsoft have led me to believe that the
- Keras requires Theano, which requires Scipy, which does not install properly on Windows from the python package repository with pip.
- To solve this problem, we will build all wheels locally, publish them to azure, and manually install them via the Kudu management console.
In this post, we’ll go through building a simple Keras neural network using the Tensorflow backend to solve the XOR problem. Then, we will create a Django web application that hosts the model, allowing the user to post data and get predictions. All of the code is available on the github here.
Note: The instructions in this post have been tested with the Tensorflow backend on a 64 bit PC, but there’s no reason why they shouldn’t work with Theano. Also, the images for the step-by-step instructions are current as of the posting of this article, but Microsoft seems to like to change the Azure Portal UIs frequently, so if you’re reading this article at a later date, the buttons to click might be in a different location. If something is egregiously out of date, feel free to email me or leave a comment.
Build the model
The model that we will be using for this tutorial solves the XOR problem. That is, it takes a 2 dimensional bit vector, and is expected to output 1 if the inputs are different, and 0 if they are the same. Using a deep neural net for this problem is the equivalent of using a lightsaber to slice a loaf of bread, but it’ll serve our purpose. The training code is shown below (and located in the /keras folder of the linked repo). This script will train the model and save two files:
- model.json: The architecture of the model. This file contains information about which layers are used in the model, their sizes, and the inter-layer connections.
- model.h5: The weights of the model. This contains the weights of each layer.
For more information about the training of Keras models, consult the Keras API. Also, it is assumed that Keras and Tensorflow are installed in the default environment.
Configure the app services instance
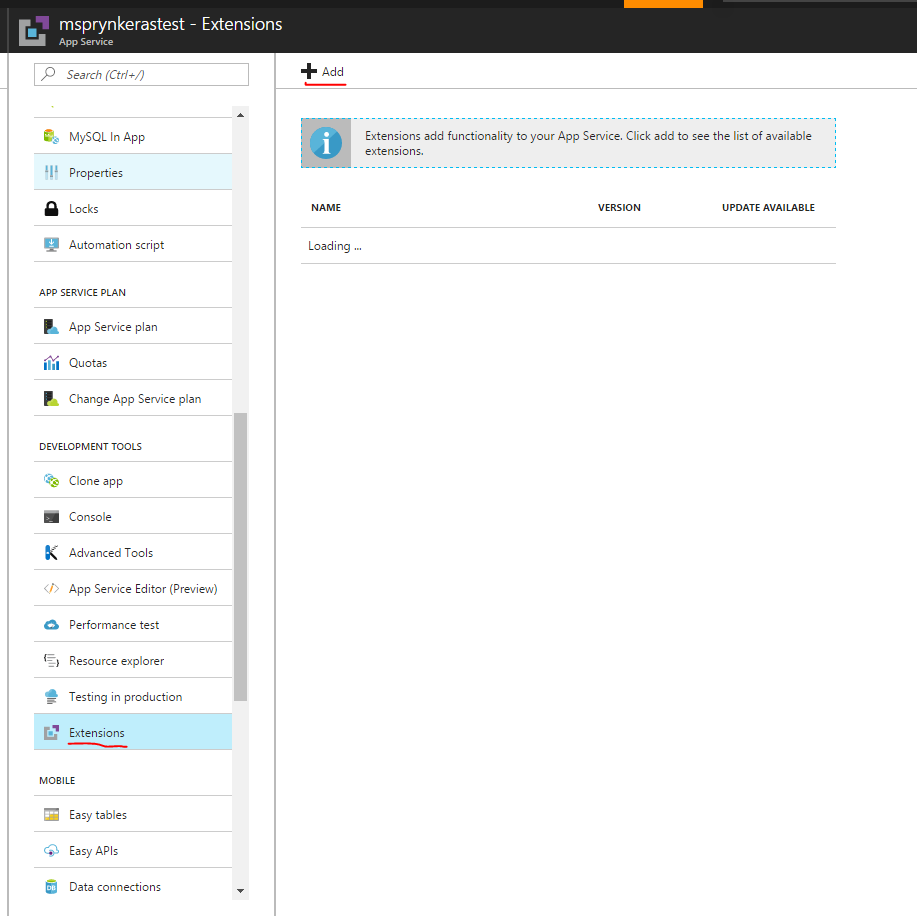
Now that we have the trained model, the next step will be to create an app service instance. Follow the instructions here to create your app services instance. Now that the app service instance is created, we need to enable python 3.5. To do this, click on the “extension” option in the UI, and scroll until python 3.5.2 x64 is found (no, there is no search :( ). Select that option, and install it.
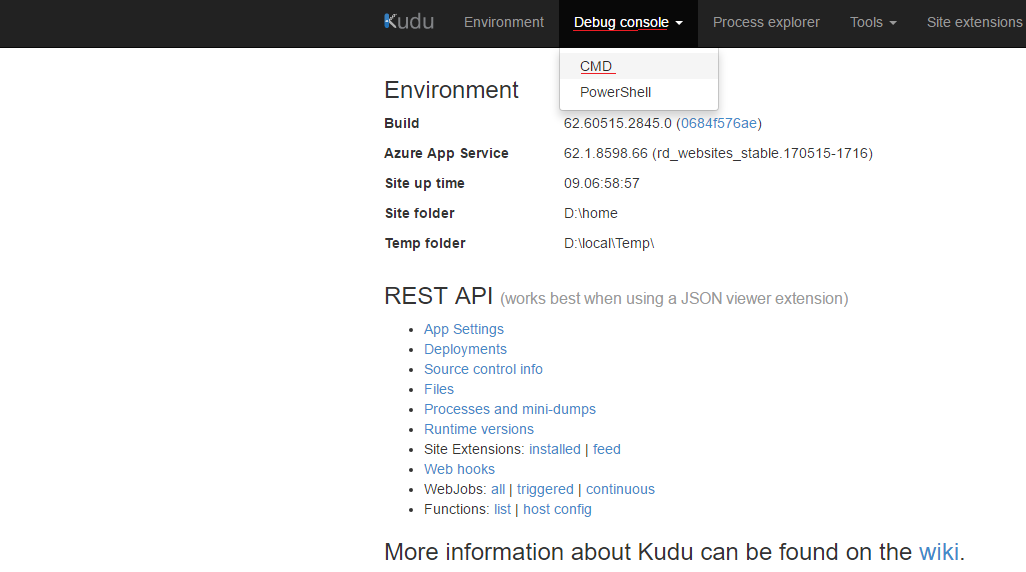
We can verify the installation via the Kudu console. Go back your app service page, and click “Advanced Tools”, then “go”. This will open up the Kudu debug tool. Select “Cmd” at the top to get a command prompt. Once it loads, you can type dir to do a directory listing. You should see something like “Python35” in the home directory (the path may be named slightly different). If you cd into that directory, you should see python.exe and wfastcgi.py. Make a note of the path to this python executable, as it will come in handy later.

Build your Django web application
The next step is to build your django web application. This is fairly straightforward, and has been explained in much more detail elsewhere. The sample project that we will be using can be found in the repo under /django. While the app is mostly straightforward, there is one subtle point. Notice that the file views.py has the following code:
...

graph = tf.get_default_graph()

...

@csrf_exempt
def predict(request):
  global graph
  with graph.as_default():
    ...
What is the point of the graph variable? The reason is that Tensorflow models don’t like being called from different threads. If these lines are removed, an error results:
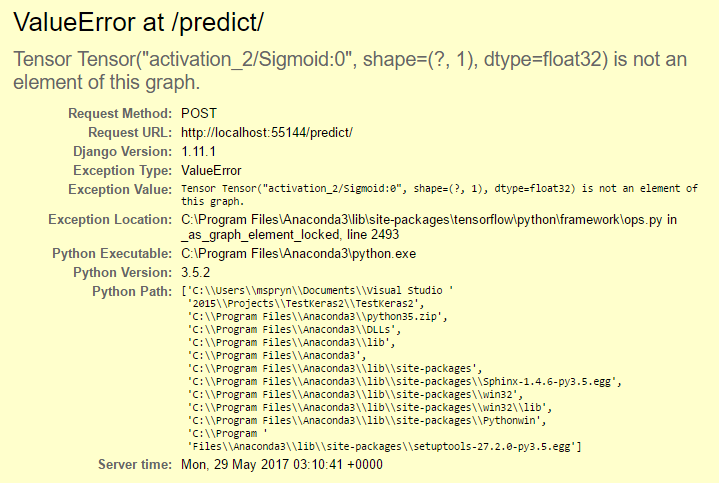
We solve this here by saving the default graph after load, and reloading it in the predict thread. If multiple models are needed to be served, then the proper model will need to be loaded in each thread. This doesn’t appear to be computationally expensive, but it can be easy to forget, and the error message isn’t very helpful. This also might not be necessary or have a different procedure if another backend (i.e. Theano) is used.
At this point, you should be able to run the model locally. If the model from the repo is being used, start the service and fire off a POST request with the following data to localhost:(whatever_port)/predict
{
  "X": "1 0|1 1"
}
And you should get a response from the web service like this:
{
  "labels": [
    [
      0.98827
    ],
    [
      0.0114
    ]
  ]
}
Build the wheelhouse
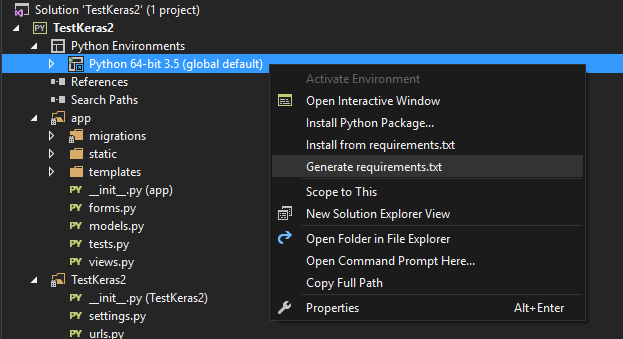
While the model works locally, it depends on packages that won’t install properly in Azure. However, we can get around this by building the packages to installable wheels locally. The first step is to create a requirements.txt from your local environment. This file tells pip what packages are installed in the current environment, along with their verisons. This can be accomplished by right-clicking on the activated environment in Visual Studio and clicking ‘Generate Requirements.txt’
Once done, you should see a new file “requirements.txt” in your project with a bunch of lines like Keras==2.0.4. Open a command prompt and cd to the directory with the requirements.txt. Run the following command to create wheels of all of the installed packages:
> python.exe -m pip wheel -r requirements.txt -w wheelhouse
This will create wheels of all of the packages listed in requirements.txt and place them into a folder called wheelhouse. It can take some time. Once finished, add this to your project directory so that when the project is deployed to Azure, the wheelhouse will be copied as well.
Setting up web.config
The next step is to modify web.config to point to the correct version of python. Without this step, python 3.4 will continue to be used, even if 3.5 is installed.
What’s that? The Django web app doesn’t have a web.config? Right-click on the project and build. This will create a web.config in the root of the project directory, but not add it to the project. Open file explorer and add it to the project. Then, perform the following steps:
- Remove the comment at the top that says something to the effect of “if this comment is here, web.config will be auto-generated.”
- Make sure that the setting “WSGI_ALT_VIRTUALENV_ACTIVATE_THIS” points to python 3.5. Use the full path to the python executable installed during the “Configure the App Services Instance” phase (you did write it down, right? :P ). Use “D:\home\Python35\python.exe”, not “Python35\python.exe”
- Make sure that the scriptProcessor attribute of the PythonHandler attribute points to the python.exe and wfastcgi.py scripts in the python 3.5 directory. Again, use full paths.
The sample project in the repo has the web.config set up correctly.
Deploy the app and install the wheels
Finally, we are ready to deploy! There is just one snag: if you try to directly deploy a python 3.5 environment, Visual Studio complains.

To get around this, we can create a dummy python 3.4 virtual environment. So, create a python 3.4 virtual environment. Then, right-click on the app and click publish. Follow the prompts to select the app service environment, your site will be published.
Once the wizard completes, your site will be up, but you will probably see either an importerror or an internal server error. This is because python will attempt to install the packages, but fail because scipy (among others) doesn’t cleanly install via pip. You can verify this issue by attempting to install scipy via pip locally: you will probably an error like this:
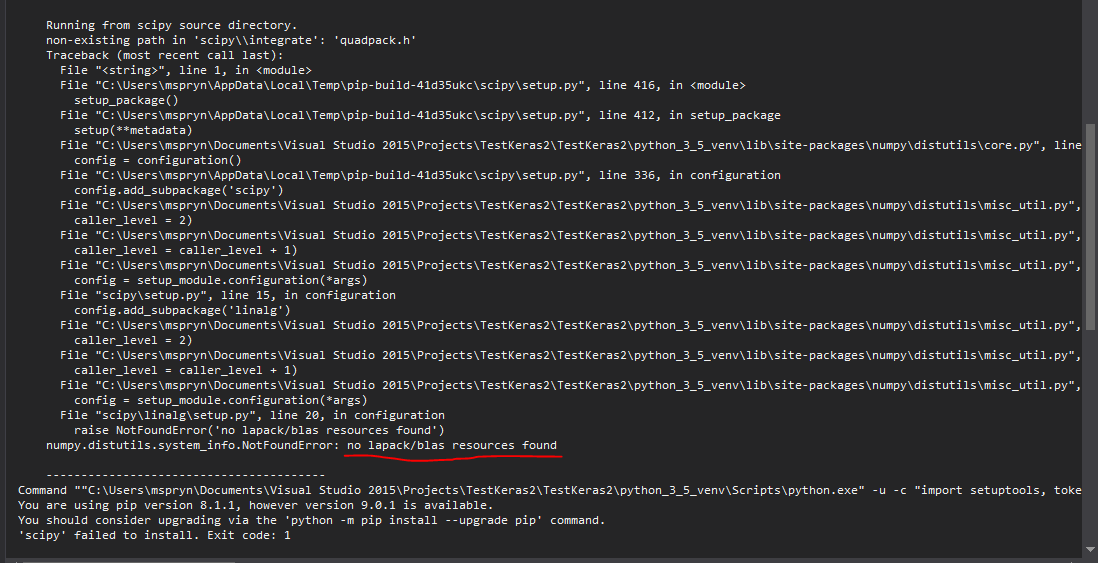
However, we already built the wheels, so we can just install those. Go back to the Kudu console from the “Configure the App Services Instance” phase. cd into your project’s root directory (which is probably under D:\home\site\wwwroot). Execute the following command, where $pypath is the full path to the python exectuable for python 3.5 (i.e. “D:\home\Python35\python.exe”, not “..\..\Python35\python.exe”)
> $pypath -m pip install --upgrade --force-reinstall --ignore-install -r requirements.txt
Go make a sandwich. This will take awhile. Also, there will be long stretches where there won’t be information printed out to the console. After a few minutes, you will see something like “Successfully installed {tons of packages}.”
Once successful, you just need to restart the application, and the website should load successfully! Try modifying the post request used earlier to test the webapp to point to the azure endpoint, and you should see a successful response. I see latencies of ~100 ms once the website is warmed up.
Conclusion
Although not without its quirks, App Services is a good, low-maintenance solution to get a deep learning model hosted in Azure quickly. With first-class integration into the Azure ecosystem, this technology allows you to create a scalable web service that hosts deep learning models in the cloud, greatly increasing the value of deep learning models in the business community.
Great post! Haven’t been able to follow the tutorial yet, but it’s great that you’re tackling a key component to actually providing utility with deep learning.
Hi. Great tutorial. Would be interested how you managed to get the server to actually run with p3.5. If i run app.py (which starts the server) in kudu it shows that the server has started at 127.0.0.1 on port 5000, which isn’t how its configured in the app…
#readLater